Today we’re announcing a completely new checkout experience for you to experiment with.
You can now link your checkouts together to create multi-step checkouts so your customers can complete their payments in steps!
Whilst single-page checkouts are great for driving high conversion rates, there are times when multi-step checkouts have a number of benefits.
- Break up complex checkouts into more manageable steps
- Create checkout flows
- Offer upsells
Simple but powerful ways you can make use of multi-step checkouts
- Capture your customer's contact details & then take payment on a second step, logging checkout abandonment to your CRM
- Take payment & then offer an upsell on a second step, increasing your average order value
- Take payment & then swap to asking questions & capturing the data you need, making managing your business needs easier
Let’s take a detailed look at how you can create a multi-step checkout today.
Breaking up your checkouts into steps
If you’re selling a product or service that requires you to capture a lot of customer information, breaking your checkout into steps can reduce checkout abandonment and increase your conversion rate.
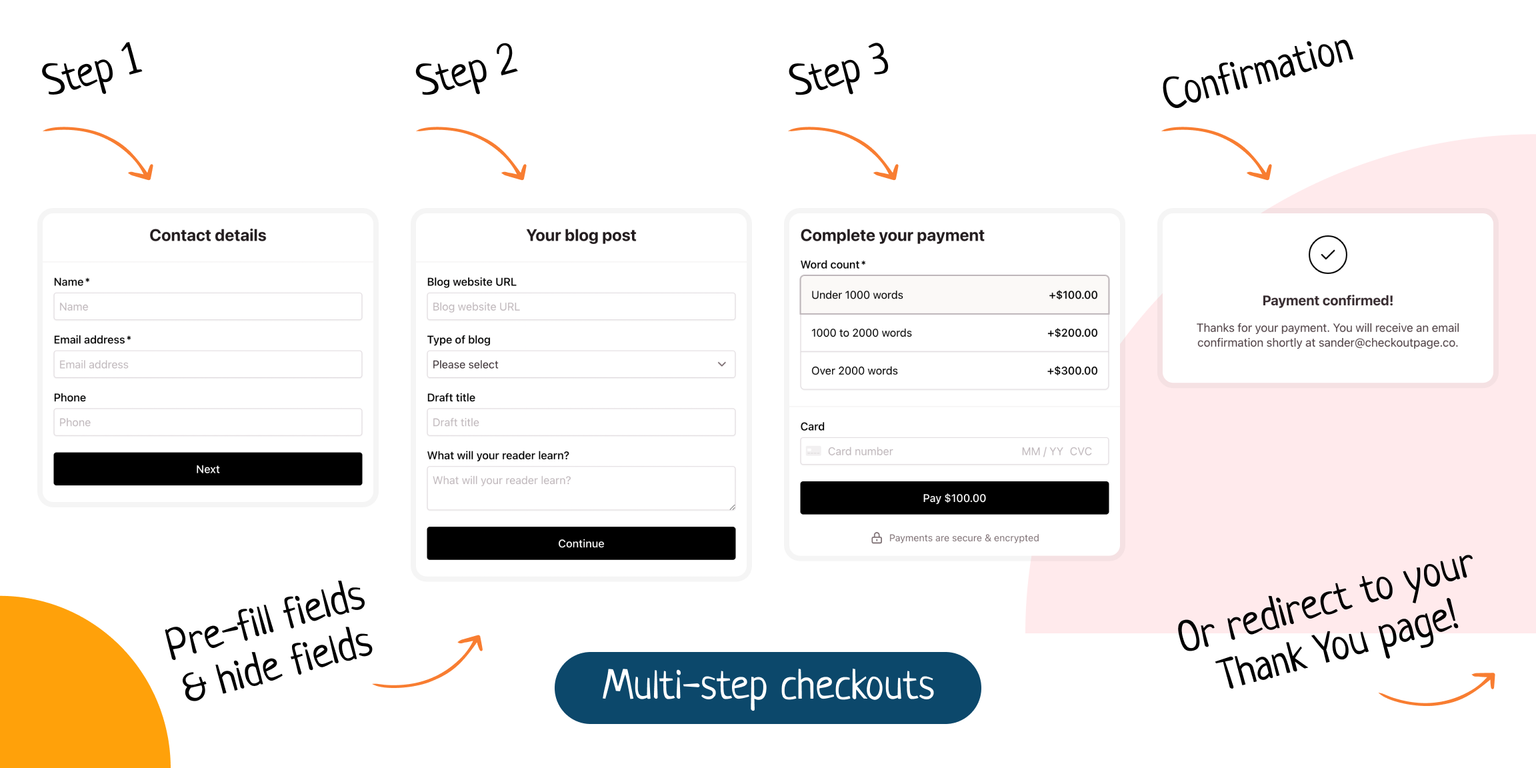
Let’s imagine you’re selling a blog post writing service that requires your customer to provide you with a lot of information about their needs.
You decide that a single-page checkout would be overwhelming and instead choose to break up your customer's journey across 3 checkouts.
Steps to create a multi-step checkout
- Plan your checkout steps
- Create a checkout for each step
- Link your checkout steps together
- Set your checkout confirmation message
- Add your multi-step checkout to your site
- Test your multi-step checkouts
Step 1 - Plan your checkout steps
When planning your multi-step checkout you should break up your customer's journey into logical steps.
For selling your blog writing service, you’ve decided to try out three checkout steps:
- Contact details
- Blog post requirements
- Payment
Your last checkout step will be followed by a payment confirmation message and email.
Important!
Every checkout step must have an email address that is used to connect it with the same customer.
Pro tip!
There is no limit to the number of checkout steps in a multi-step checkout.
Plan Checkout 1: Contact details
Ask your customer to complete their contact details.
- Name
Plan Checkout 2: Blog post requirements
Find out what your customer needs from your service.
- Name (pre-filled & hidden)
- Email (pre-filled & hidden)
- Blog URL
- Type of blog?
- Lifestyle
- Business
- News
- Draft title
- What will your reader learn?
Plan Checkout 3: Payment
Set the price and let your customer complete their payment.
- Name (pre-filled & hidden)
- Email (pre-filled & hidden)
- Product variant for word count
- Under 1000 words - $50
- 1000 to 2000 words - $100
- Over 2000 words - $100
- Card details
Step 2 - Create a checkout for each step
Once you’ve planned out your customer’s journey in logical steps, let's create your three checkouts.
Create Checkout 1: Contact details
- Create Checkout 1
- Type the name of this step (Contact details) under the Product name
- Select Lead capture
- Under Fields, choose to Add a custom field to capture your customer's name
- Click on the Custom labels section under Design and rename the label of Submit button as Continue
- Under After payment, click on **Email confirmation **and select No email
- Untick Receive emails about new payments below Payment notifications
Create Checkout 2: Blog post requirements
Instead of creating Checkout 2 from scratch, we recommend you duplicate Checkout 1 and add fields to it.
Duplicating checkouts as you go will make sure that your last checkout includes every step's data.
- Duplicate Checkout 1 by clicking on the drop-down arrow next to the checkout from your dashboard
- Change the name of this step (Blog post requirements) under the Product name
- Under Fields, click on the pencil icon next to each of the fields from the previous step
- Scroll to Additional settings and tick to Hide field
- Hide all the fields from the previous step
- Add new fields to capture your customer's requirements
Important!
In your preview, your hidden field will be greyed out (50% opacity). Don’t worry, your hidden field is only visible to you.
Create Checkout 3: Payment
Adjust your last step to enable payments.
- Duplicate Checkout 2 by clicking on the drop-down arrow next to the checkout from your dashboard
- Change the name of this step (Payment) under the Product name
- Swap Pricing from Lead Capture to One-time payment and set your price
- Add variant for any customizable options (like Word count)
- Under Fields, click on the pencil icon next to each of the fields from the previous step
- Scroll to Additional settings and tick to Hide field
- Hide all the fields from the previous step
- Under After payment, tick Receive emails about new payments below Payment notifications
Step 3 - Link your checkouts together
Now it’s time to link your checkouts together.
- Edit Checkout 1
- Under After payment, click on Checkout confirmation & redirect and select Next checkout
- Choose Checkout 2 from the dropdown
- Click Save
Repeat the above for Checkout 2 to link it to Checkout 3.
That’s it, you’ve created a multi-step checkout.
Important!
If you choose not to duplicate the checkouts, make sure to use the exact same field labels/data types throughout your multi-step checkout to pre-fill your fields.
Step 4 - Set your checkout confirmation message
Let your customer know that the checkout has been successful.
Choose between the following:
- Display a confirmation message & send a confirmation email
- Redirect to a website URL
Display a confirmation message & send a confirmation email
Confirm payment, thank your customer for their purchase, and let them know about any next steps.
Redirect to a website URL
Redirect your customer to your own Thank You page.
Step 5 - Add your multi-step checkout to your site
From your dashboard, click Share next to Checkout 1 to add your checkout to your site.
You can choose to add it as a pop-up or as a responsive embed on your page.
Step 6 - Test your multi-step checkout
The best way to make sure everything is working as expected is to make a test payment.
- Edit your Checkout 1
- From the Preview, complete your checkout fields and submit
- Check if the preview displays the next checkout and goes through all the steps
- Use the test card details to complete the test payment
- Make sure that repeating fields are pre-filled and hidden
Testing checklist
- Does each checkout break up your customer's journey into logical steps?
- Are your checkouts linked together in the right order?
- Are your checkouts missing any information, variants, downloads, or fields?
- Are you making your customer complete any details twice?
- Are unnecessary fields hidden?


